Proxmox GPU Passthrough Tutorial (AMD Ryzen 9 7950X + NVIDIA RTX 5060 Ti)
This post is a cleaned-up tutorial from a real troubleshooting session. The target setup is:
- Host: Proxmox VE on AMD platform
- CPU: Ryzen 9 7950X (with integrated AMD Raphael graphics)
- Motherboard: MSI PRO B650M-A WIFI
- Discrete GPU to passthrough: NVIDIA GeForce RTX 5060 Ti
- Host display stays on the Ryzen iGPU, while the NVIDIA card is dedicated to the VM
If you are on a similar AM5 + NVIDIA setup, this walkthrough should map very closely.
Technology Stack Behind This Tutorial
This guide touches multiple layers of the virtualization stack. Understanding these layers makes troubleshooting much easier:
-
Firmware layer (UEFI/BIOS)
SVM(AMD-V) enables CPU virtualization extensions.IOMMU(AMD-Vi) enables DMA remapping and device isolation.- UEFI mode avoids legacy initialization behavior that can interfere with modern GPU passthrough.
-
Hypervisor layer (Proxmox VE)
- Proxmox is the management layer; actual VM acceleration is provided by Linux
KVMand device emulation byQEMU. - GPU passthrough means QEMU exposes a real PCIe device directly to the guest, instead of emulating a virtual GPU.
- Proxmox is the management layer; actual VM acceleration is provided by Linux
-
Isolation layer (Linux IOMMU groups)
IOMMU=Input-Output Memory Management Unit.- The kernel groups PCI devices by isolation boundaries.
- Passthrough is safe/reliable only when devices are in proper IOMMU groups.
-
Driver binding layer (VFIO)
VFIO=Virtual Function I/O.vfio(VFIO core framework),vfio_iommu_type1(Type-1 IOMMU backend),vfio_pci(PCI device binding driver), andvfio_virqfd(virtual interrupt eventfd support) allow userspace VMs to own PCI devices securely.- Binding the GPU to
vfio-pciprevents host graphics drivers from taking the card first.
-
Boot and module orchestration layer
- GRUB injects kernel flags (
amd_iommu=on iommu=pt). initramfsensures required modules and binding logic are available early during boot./etc/modules-load.d/controls module auto-load;/etc/modprobe.d/controls module options and blacklists.
- GRUB injects kernel flags (
-
Guest VM platform layer
OVMF (UEFI)+q35gives a modern virtual platform aligned with PCIe passthrough.CPU type: hostexposes native CPU features.- Disabling memory ballooning avoids DMA-related instability for passthrough workloads.
-
Verification toolchain
dmesg,/proc/cmdline,find /sys/kernel/iommu_groups, andlspci -nnkvalidate host readiness.nvidia-smivalidates the guest-side driver and runtime state.
1. What Success Looks Like
Before details, here is the expected end state:
- BIOS has SVM and IOMMU enabled.
- Kernel boots with
amd_iommu=on iommu=pt. - IOMMU groups exist under
/sys/kernel/iommu_groups/. - NVIDIA GPU functions are bound to
vfio-pcion the host. - VM is created with
OVMF (UEFI)+q35, and GPU is attached as PCI passthrough.
2. BIOS Configuration (MSI Click BIOS 5)
Step 1: Enter Advanced BIOS
Enter BIOS (usually Delete at boot), then switch to Advanced Mode.
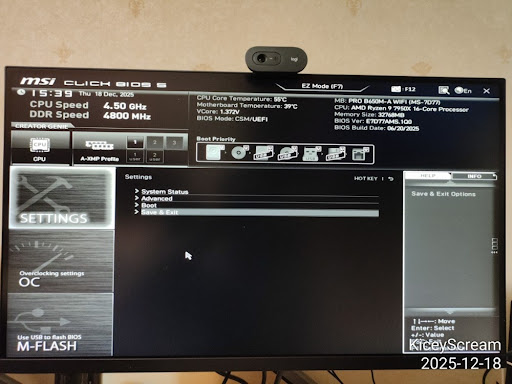
Step 2: Navigate to AMD CBS
Go to:
OC->Advanced CPU Configuration->AMD CBS
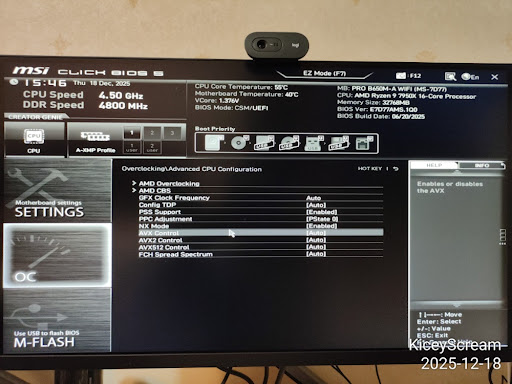
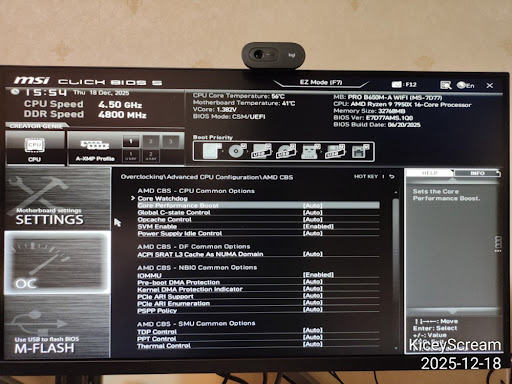
Step 3: Enable Virtualization Features
Inside AMD CBS, set:
SVM Enable->EnabledIOMMU->Enabled
Use explicit Enabled instead of Auto for passthrough reliability.
Under the hood:
SVMenables hardware-assisted virtualization instructions used by KVM.IOMMUenables DMA remapping, which is the foundation for safe PCIe passthrough.- If either is missing, VFIO can load but device assignment will typically fail or be unstable.
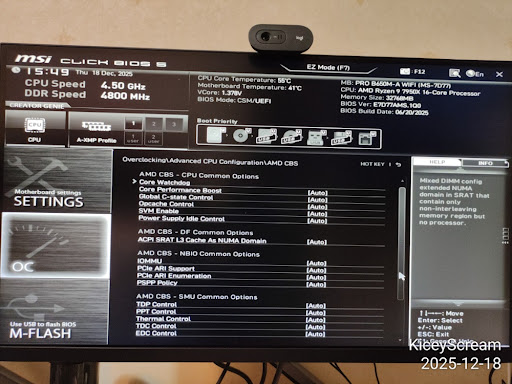
Step 4: Optional Stability Tweak
Optional on Ryzen hosts used as servers:
Global C-state Control->Disabled
Other options like Pre-boot DMA Protection and PCIe ARI Support can remain Auto unless you have a specific need.

Step 5: Confirm Boot Mode
In Settings -> Boot, confirm UEFI boot mode.
Boot mode selectshould beUEFI
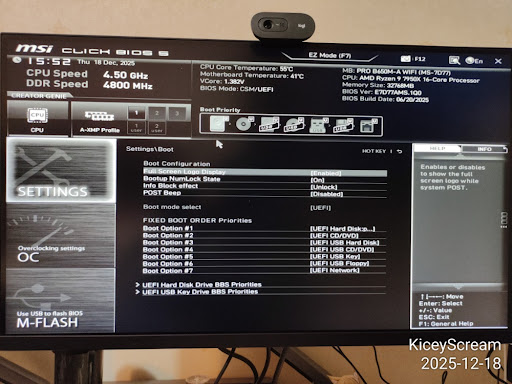
Save and reboot (F10).
3. Verify and Enable IOMMU in Proxmox
Step 6: First Check in Host Shell
On AMD, you may initially see detection lines such as:
This confirms hardware is visible, but we still need kernel flags.
Step 7: Add Kernel Parameters (GRUB)
Check current cmdline:
In this session it showed root=/dev/mapper/pve-root, which indicates GRUB on LVM.
Edit:
Set:
Why these flags matter:
amd_iommu=on: explicitly enables AMD IOMMU support in kernel boot path.iommu=pt: keeps host-side overhead lower for non-assigned devices by using pass-through mappings where possible.- Without correct boot flags, BIOS settings alone may not produce usable runtime isolation.
Apply and reboot:
After reboot, verify:
You should now see amd_iommu=on iommu=pt.
Step 8: Verify IOMMU Groups Exist
Quick check:
Better check (shows actual group entries):
If /sys/kernel/iommu_groups/ exists and contains entries, IOMMU is active.
This is a key architectural checkpoint: IOMMU groups are the kernel's isolation model, and VFIO relies on this model to guarantee a device can be safely handed to a VM.
4. Load VFIO Modules at Boot
Historically people edited /etc/modules, but on systemd-based systems the cleaner way is a dedicated file in /etc/modules-load.d/.
Stack detail:
/etc/modules-load.d/*.confcontrols which kernel modules are loaded at boot./etc/modprobe.d/*.confcontrols module parameters (for example, VFIO device IDs) and blacklists.- Keeping loading and policy in separate files makes maintenance and debugging clearer.
Create:
Add:
Update initramfs:
If you see:
that is normal for a GRUB/LVM layout.
Reboot:
5. Bind the NVIDIA GPU to vfio-pci
Step 9: Identify GPU IDs
In this setup:
- NVIDIA GPU:
01:00.0->[10de:2d04] - NVIDIA audio:
01:00.1->[10de:22eb] - Host iGPU (keep for Proxmox): AMD Raphael
11:00.0(amdgpu)
Step 10: Configure vfio-pci IDs
Create:
Add:
What this does:
ids=...tells VFIO exactly which PCI functions to claim (GPU + HDMI/DP audio).disable_vga=1helps avoid legacy VGA routing conflicts on some boards/firmware combinations.
Step 11: Blacklist Host NVIDIA Drivers
Create:
Add:
Notes:
- Do not blacklist
amdgpu(host iGPU needs it). blacklist radeonis optional and usually unnecessary on modern Ryzen iGPU setups.
The binding order is critical: if nouveau/nvidia binds first, VFIO cannot cleanly claim the device later without manual unbind/rebind.
Apply and reboot:
Step 12: Final Host-Side Verification
Success should look like:
The chat session reached this exact success state.
6. Create the Ubuntu VM (Proxmox UI)
Once host-side binding is done, create a new VM instead of reusing old SeaBIOS templates.
Recommended wizard settings:
- OS: your Ubuntu ISO
- System:
- BIOS:
OVMF (UEFI) - Machine:
q35 - Graphics: keep
DefaultorVirtIO-GPUduring install
- BIOS:
- CPU:
- Type:
host
- Type:
- Memory:
- Disable ballooning
- Network:
VirtIO
Why this VM stack is recommended:
OVMFmatches modern GPU firmware expectations and guest driver behavior.q35models a PCIe-first chipset, which is a better fit for passthrough than legacyi440fx.VirtIOkeeps paravirtualized devices efficient so CPU/GPU resources are focused on real workloads.
Then add PCI device:
Hardware->Add->PCI Device- Select
01:00.0(NVIDIA VGA) - Check:
All FunctionsROM-BarPCI-Express
Why only 01:00.0?
- Because
All Functionsalso includes01:00.1audio automatically.
Install Ubuntu, then inside guest install NVIDIA driver and verify with:
7. Troubleshooting Notes
vfio-pcinot in use after reboot:- Recheck
vfio.conf, blacklist file, and rerunupdate-initramfs -u -k all.
- Recheck
- No IOMMU groups:
- Recheck BIOS SVM/IOMMU and kernel cmdline flags.
- Black screen when starting VM installer:
- Keep a virtual display enabled during initial install, then tune display later.
- Confused by
Kernel modules:output inlspci:- It only means modules exist;
Kernel driver in useis what matters.
- It only means modules exist;
8. Summary
The host side is done when both 01:00.0 and 01:00.1 show Kernel driver in use: vfio-pci.
At that point, Proxmox is no longer using the NVIDIA card, and the VM can claim it directly for near-native performance.